Event-Driven Architecture:- Event Driven Architecture(EDA) is a software design pattern in which decoupled application can asynchronous publish and subscribe to events via an event broker/message broker.
In an Event-Driven Architecture, application will communicate with each other by sending and/or receiving events or messages. Event-Driven architecture is often referred to as “Asynchronous” communication. Event-Driven apps can be created in any programing languages because event-driven is a programing approach, not a language. An event-driven architecture is loosely coupled.
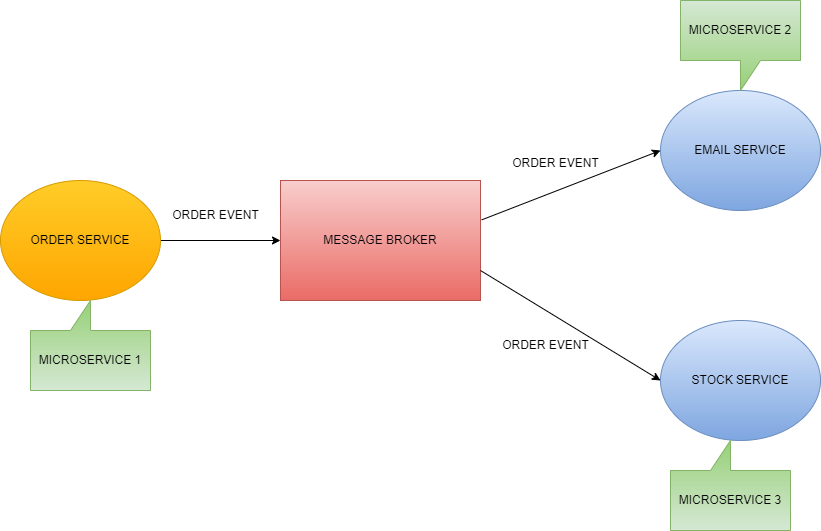
Event-Driven Microservices Architecture with Multiple Consumer
NOTE:-
- All services are loosely connected.
- This architecture refers asynchronous communication.
Advantages Even Driven Microservices:-
- Improves Flexibility and Maintainability
- High scalability
- Improved Availability
Let us suppose as above screenshot when any user ordered some product. So in real time send notification and update the stock of the product. Here we are creating 4 microservices.
- Order Service:- Create a service for pushing order detail message to Kafka Broker.
- Stock Service:- Consume the order detail message from Kafka Broker and update stock as per order.
- Email Service:- Consume the order detail message from Kafka Broker and send notification to user, Marchant, etc.
- Base Domain:- Create common entity which entity can use other all(order service, stock service, email service, base domain) services
STEP 1: Create Order, Email, Stock service from start.spring.io with given dependency.
<dependency>
     <groupId>org.springframework.boot</groupId>
     <artifactId>spring-boot-starter-web</artifactId>
</dependency>
<dependency>
    <groupId>org.springframework.kafka</groupId>
    <artifactId>spring-kafka</artifactId>
</dependency>
STEP 2: Create Base Domain service from start.spring.io with given dependency.
<dependency>
    <groupId>org.projectlombok</groupId>
    <artifactId>lombok</artifactId>
    <scope>provided</scope>
</dependency>
STEP 3: Go to “Base Domain” project and create class Order under DTO package.
import lombok.AllArgsConstructor;
import lombok.Data;
import lombok.NoArgsConstructor;

@Data
@AllArgsConstructor
@NoArgsConstructor
public class Order {
       private String orderId;
       private String name;
       private int quantity;
       private double price;
      }
STEP 4: Go to “Base Domain” project and create another class OrderEvent under DTO package.
import lombok.AllArgsConstructor;
import lombok.Data;
import lombok.NoArgsConstructor;

@Data
@AllArgsConstructor
@NoArgsConstructor
public class OrderEvent {
	private String message;
	private String status;
	private Order order;
}
STEP 5: Run ZOOKEEPER and KAFKA SERVER
Now Setup OrderService as Kafka Producer so follow given steps.
STEP 6: Go to OrderService and copy & paste given properties in application.properties file.
server.port:8080
## topic name
spring.kafka.topic.name:order_topics
## Bootstrap zookeeper and apache kafka server
spring.kafka.producer.bootstrap-servers:localhost:9092
#spring.kafka.producer.key-serializer:org.apache.kafka.common.serialization.StringSerializer
#spring.kafka.producer.value-serializer:org.springframework.kafka.support.serializer.JsonSerializer
spring.kafka.producer.key-serializer:org.apache.kafka.common.serialization.StringSerializer
spring.kafka.producer.value-serializer: org.springframework.kafka.support.serializer.JsonSerializer
spring.kafka.consumer.properties.spring.json.trusted.packages=*
STEP 7: Create config package and create class KafkaTopicConfig then Copy & paste given code in this file.
import org.apache.kafka.clients.admin.NewTopic;
import org.springframework.beans.factory.annotation.Value;
import org.springframework.context.annotation.Bean;
import org.springframework.context.annotation.Configuration;
import org.springframework.kafka.config.TopicBuilder;

@Configuration
public class KafkaTopicConfig {

	@Value("${spring.kafka.topic.name}")
	private String topicName;

	@Bean
	public NewTopic topic() {
		return TopicBuilder.name(topicName).build();
	}
}
STEP 8: Go to pom.xml file and add Base Domain service as dependency
<dependency>
   <groupId>com.fullStackBlogs</groupId>
   <artifactId>BaseDomain</artifactId>
   <version>0.0.1-SNAPSHOT</version>
</dependency>

NOTE:- Go to Base Domain and copy groupId, artifactId and version as per above screenshot.
STEP 9: Create OrderProducer class with @service annotation.
import org.apache.kafka.clients.admin.NewTopic;
import org.slf4j.Logger;
import org.slf4j.LoggerFactory;
import org.springframework.beans.factory.annotation.Autowired;
import org.springframework.kafka.core.KafkaTemplate;
import org.springframework.kafka.support.KafkaHeaders;
import org.springframework.messaging.Message;
import org.springframework.messaging.support.MessageBuilder;
import org.springframework.stereotype.Service;
import com.fullStackBlogs.BaseDomain.DTO.OrderEvent;

@Service
public class OrderProducer {

	private static final Logger LOGGER = LoggerFactory.getLogger(OrderProducer.class);

	@Autowired
	private NewTopic topic;

	@Autowired
	private KafkaTemplate<String, OrderEvent> kafkaTemplate;

	public void sendMessage(OrderEvent event) {
		LOGGER.info("################## send message to topic using apache kafka #######################");
		Message message = MessageBuilder.withPayload(event)
													.setHeader(KafkaHeaders.TOPIC, topic.name())
													.build();
		kafkaTemplate.send(message);


	}
}
STEP 10: Create Rest API for testing. Create OrderController class under Controller package and copy & paste given code under this class.
import java.util.UUID;
import org.springframework.beans.factory.annotation.Autowired;
import org.springframework.web.bind.annotation.PostMapping;
import org.springframework.web.bind.annotation.RequestBody;
import org.springframework.web.bind.annotation.RequestMapping;
import org.springframework.web.bind.annotation.RestController;
import com.fullStackBlogs.BaseDomain.DTO.Order;
import com.fullStackBlogs.BaseDomain.DTO.OrderEvent;
import com.fullStackBlogs.OrderService.Service.OrderProducer;

@RestController
@RequestMapping("api/v1")
public class OrderController {

	@Autowired
	private OrderProducer orderProducer;

	@PostMapping(value = "/order")
	public String placeOrder(@RequestBody Order order) {
		order.setOrderId(UUID.randomUUID().toString());

		OrderEvent orderEvent = new OrderEvent();
		orderEvent.setStatus("PENDING");
		orderEvent.setMessage("Order Status is in pending state");
		orderEvent.setOrder(order);

		// Send Message
		orderProducer.sendMessage(orderEvent);
		return "Order placed successfully";
	}
}
Now Setup StockService as Kafka Consumer so follow given steps.
STEP 11: Go to StockService and copy & paste given properties under application.properties file
## server port
server.port:8081
## kafka consumer
spring.kafka.consumer.bootstrap-servers:localhost:9092
spring.kafka.consumer.group-id:Stock
spring.kafka.consumer.auto-offset-reset:earliest
spring.kafka.consumer.key-deserializer:org.apache.kafka.common.serialization.StringDeserializer
spring.kafka.consumer.value-deserializer: org.springframework.kafka.support.serializer.JsonDeserializer
spring.kafka.consumer.properties.spring.json.trusted.packages=*
spring.kafka.topic.name:order_topics
STEP 12: Go to pom.xml file and add Base Domain service as dependency
<dependency>
   <groupId>com.fullStackBlogs</groupId>
   <artifactId>BaseDomain</artifactId>
   <version>0.0.1-SNAPSHOT</version>
</dependency>
NOTE:- Go to Base Domain and copy groupId, artifactId and version as per above screenshot.
STEP 13: Create OrderConsumer Class under StockService for consuming orderdetail which is produce by OrderService.
import org.slf4j.Logger;
import org.slf4j.LoggerFactory;
import org.springframework.kafka.annotation.KafkaListener;
import org.springframework.stereotype.Service;
import com.fullStackBlogs.BaseDomain.DTO.OrderEvent;

@Service
public class OrderConsumer {

	private static final Logger LOGGER = LoggerFactory.getLogger(OrderConsumer.class);

	@KafkaListener(topics = "${spring.kafka.topic.name}", groupId = "${spring.kafka.consumer.group-id}")
	public void consume(OrderEvent event) {
		LOGGER.info("******************  event name [{}]", event.toString());
	}
}
Now Setup EmailService as Kafka Consumer so follow above steps 11, 12 13.
Let’s run the Order Service, Stock Service, Email Service. Make sure before run above services ZOOKEEPER and KAFKA SERVER are running properly.
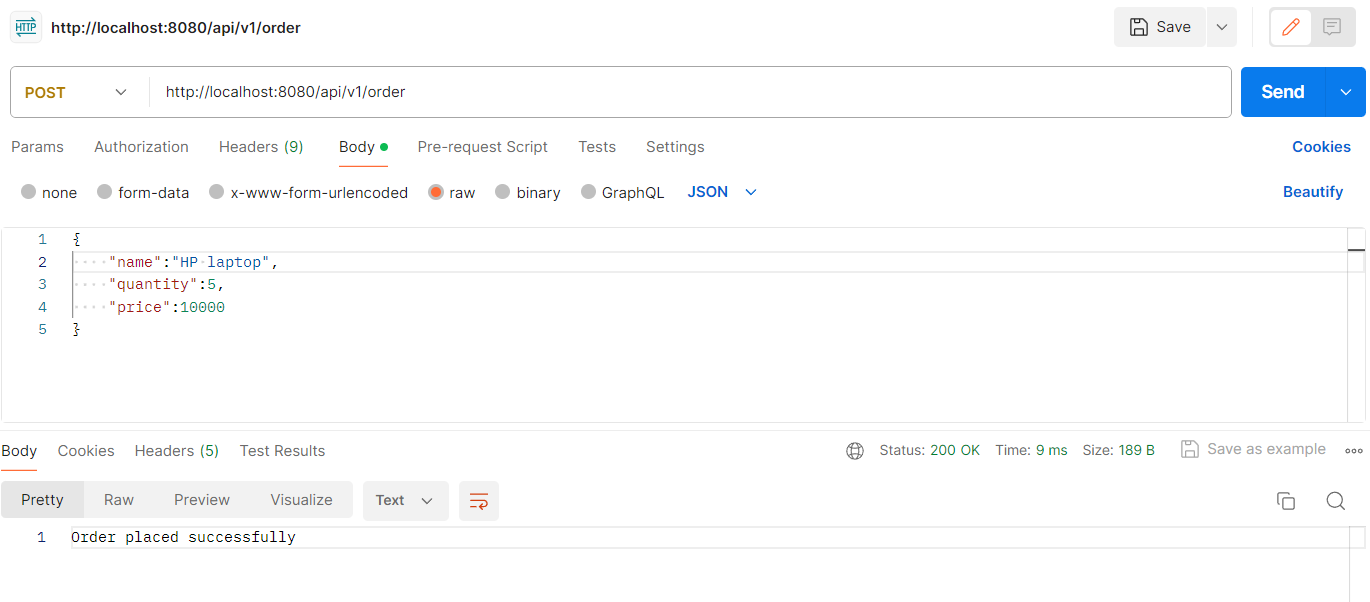
Now you can run given API from POSTMAN and check stock service and email service console. These service are receiving message on real time.
REST API:- http://localhost:8080/api/v1/order
Request Body:- {“name”: “HP laptop”,”quantity”: 5,”price”: 10000}
NOTE:- If you don’t know how to run ZOOKEEPER and KAFKA server so read given blog
How to install and setup Apache Kafka and run Zookeeper and Kafka server
That’s all.